Sunday, June 10, 2012

New Tricks and Old Dogs

Every once in a while you run across a brilliant idea that is so simple it just leaves you smacking yourself upside the head and muttering, "Of course!!?". I had always meant to look into hollow extruding. I don't often use my extruder because it's a little tedious--conditioning, assembling, cranking, etc. That being said, when I do drag it out, I generally have fun with it after a bit. So when I ran across bounty_gg's brilliant little one-page tutorial on how to easily convert your ordinary extruder dies into coring dies, I had to dash into the studio and try it out. (Yes, I do know that coring dies are made for most extruders--but being cheap, lazy, and the instant-gratification kind of girl I am, well, I'd rather cobble something up now than order it and wait.


Here's the link to the original tute: http://www.flickr.com/photos/bounty_gg/4006100573/in/faves-8989180@N02/
Her name is Galina and she is not only one sharp cookie, she is very generous with her ideas and discoveries.

So here is how you do this, with a makins or any other inexpensive hand extruder. Enjoy, experment, and post your addendums for everyone's benefit!

Most extruders have a 7-hole die--this is crucial.

Find a small screw or nail that fits easily into the center hole of the 7-hole die. Then find either flat washers with big holes or O-rings that fit into the retaining cap of the extruder. Fish out your medium size square, hexagonal, whatever shape dies that you want to for the final shape of the outside of the bead. (Why medium? because the clay goes through the 7-hole die first; if the final die is too large, the clay won't compress and you will end up with a handsome assortment of half-round worms.

See the illustrations below:


The sequence is was makes it all work--you must have space between your 'coring die' and your shape die.
So; left to right, Retaining cap, final shape die, spacers (either a couple of large-hole flat washers or O-rings), and coring die.
load them in in that order, load your conditioned clay into the barrel, screw the retaining cap on tight, and build up those biceps. Squeeze, baby! Or crank. Whatever.

If you used enough clay, your final extruded snake should be about 10" long, with a perfect hole running all the way through.
To make cores for hollow bangles, I wrap the core around a form and cut the ends flush, then smooth the join well and cure. It's far easier I find, to work with a solid bangle than two halves--I finish my bangles completely, right down to the final sand and polish, then warm it in the oven briefly, cut the halves apart (doesn't matter where the original seam was, really!!), and string my elastic cord through. I find this invariably gives me a near-invisible join when the bracelet comes back together over the wrist.

A couple of notes:
Mari O'Dell did a cool tute on hollow twisted beads a while back, and that's applicable these, too; especially the square shape. I find it best for put the extruded snake onto some type of support--thin rod, long needle, or even weed-wacker cord--anything that will keep the hole from collapsing, and gently twist into some very cool shapes.
(These look smashing when done in metallic colors like pearl-ex over black clay.
Cut into beads while still on the support if you want to avoid distortion.
Remember that if you extrude scrap clay as the core that the final bead/bracelet can be as large as you wish--you can also build up a middle layer with ultralight clay as a filler that will allow you to make really big items with little weight. (Do not build up to the inside of the braclet, or it won't fit.)I always cure my core before covering--it helps keep the holes intact. Just use a liquid clay like bake'n'bond, TLS or polypaste to adhere the next layer of raw clay.

Anyway, hope this gives you another arrow for the quiver--have a great Summer.

Namaste,
Randee

Thursday, May 24, 2012

Friday, April 13, 2012

Sharing Nicely


I love all the information that is available to the Polymer
Clay Artist. There are many free resources available to us on the internet in
the form of tutorials and video lessons. If you wish to spend a little money,
there are quite a few people offering tutorials for a fee, and some sites that
offer video lessons for a fee. And let us not forget all of the wonderful how-to
books that are on the market! How lucky we are to have all this information
available to us!
The problem that I run into is that all of the purchased
tutorials make the same request: to please not share the information, and to
give credit to the author. While I do strive to comply with this- after all, it
is a lot of work to write and develop tutes, and the author deserves to profit
from them- after a while, this process becomes rather cumbersome. Quite a bit
of my work involves multiple techniques that I have learned from many sources.
So, for a simple cabochon that I make, should I be crediting every person that
has influenced the work? “This cabochon
was produced using the Skinner blend technique by Judith Skinner, color theory
by Maggie Maggio, Hidden Magic technique as shown on Parole de Pate, Mold by
Penni Jo Couch, and finished with
techniques learned from Donna Kato.” Whew! Now that is a mouthful!
The other problem I run into is that I forget which methods
and techniques I learned from a purchased tutorial, and which ones I learned
from books or free from the internet. I
teach and share a lot of information- what if I accidentally share “secret”
info from a purchased tute? I am not in the habit of being secretive about my
work, and it is just too hard to remember what I can and cannot share. This is
not to say that I set out on purpose to teach “forbidden” information. I do try
and respect copyright and proprietary information. It’s just that after I incorporate
what I have learned and make my own items, it is hard to keep all the particulars
separate. The other thing I tend to do
is not follow instructions exactly. So if I tweek a tute, does it then become
mine to share?
Just thinking about all of this makes my head hurt. I guess
I’ll just have to do my best to not share “secret” information. And please, do
not sic the Polymer Tute police on me. I’m doing my best to be good!
Remember to Clay Nicely!
Nora

Tuesday, February 14, 2012


Polymer Clay and Mad Scientists
There's something about polymer that just begs people to experiment with it-- it brings out the explorer in just about everyone I know. Perhaps it's because this material attracts a certain type of person--the one who colors outside the lines, who is always asking themselves" What if?"
Because new products are being developed all the time to take advantage of the material's extrordinary versatility, the game changes constantly; and there is an unbelievable wealth of new techniques and versions just itching to be realized. You will always see something new, as we are in the infancy of this artform, and it is worth the price of admission for that fact alone.
Some of the artists who work in the medium like myself, prefer an unorganized approach to the the game--Personally, I love surprises, and in Polymer, almost all of them are good ones. Like many of the greatest discoveries of Science, happy accidents abound; the piece that was thought irrevocably burned turned out to be a beautiful new way to control the color, giving depth and interest to an otherwise pedestrian piece of work, as in these 'Deeply Cured' bangles:
Total accident--but they opened the door to another technique.
Other artists have a far more methodical approach, keeping meticulous notes and photographing their processes, to the undying gratitude of the more free-spirited among us--the comparisons and reserach that they publish saves the rest of us enormous amounts of time and effort, and enables the entire polymer clay community to take another giant step forward.
Roberta Warshaw, a wonderful polymer artist http://www.etsy.com/people/RobertaWa out of Boston, recently put up some shots on her flickr stream, detailing the differences in the two major brands of inks which can be used to color the clay--I found this particularly inmportant, because it's nearly impossible looking at those tiny bottles of intense color to know how they'll look on the clay.
Many of us use what is locally available--Ranger brand, for example, is nearly everywhere--but is helpful to know if there' something more suitable for a particular project that you might want to make the effort to find. Pinata inks by Jac
quard are a little more difficult to track down, but when you look at the difference in hue and intensity, it does make a difference--sometimes the difference between the absolutely perfect, and the well, maybe it will do.
On the right, what the Pinata Inks look like on pure white clay:
and below, the Ranger Inks on the same surface:
Huge difference-- now I'm not saying that one is necessarily better than the other--all materials have their uses--but I find definitely gravitate to the brighter colors.
Thanks so much, Roberta! This will come in handy for all of us!
Namaste,
Randee

Saturday, December 24, 2011

Twists on Technique

One of the fabulous things about polymer clay (and the internet) if that the material is flexible enough to allow for a range of experimentation; people are constantly taking a technique which they have learned, and adding to it--sort of like that old game of 'telephone', where a word or phrase passes from person to person, until it comes full circle in a nearly unrecognizable form.


Last year I published a tutorial on making faux twigs, after much experimentation on my own; I, of course, was influenced by looking at other artists--Kim Cavender, especially.

My take on the faux twigs was in pursuit of realistic looking lightweight polymer pieces that could be included in jewelry--and one of the weaknesses of the tutorial was that it required the artist to drill after curing--something that many people are neither set up for, nor comfortable with.


Of course I included sugggestions such as wirewrapping to add the elements, but still....


So I was completely delighted the other day to get a lovely email from an artist in Italy, who had come up with a brilliant and beautful way to overcome the drilling problem:


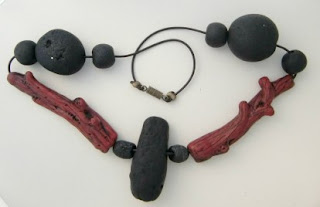
Her screen name is Primatoide Futile, and her work is notable for the sophistication that she achieves with simple palletes and shapes--but what knocked me out was her elegant solution for the non-drillers among us--she simply combined two techniques--creating hollow tubes in polymer, then creating the twig around it;


Voila!! A twig that can be strung lengthwise, easy-peazy.
Prima didn't say, but I suspect that she cures her hollow tubes after creating them on a knitting needle or other armature, then adds the raw clay to the surface, and molds and textures it
as instructed in the tutorial; the look is smashing.


As always, I learn as much or more from my students than they do from me....


Namaste,


Randee

Sunday, November 20, 2011


Artists I admire.....


There are so many artists working in polymere that I intensely admire and take inspiration from that it would be impossible to list them--so I'll take the random approach and put the spotlight on Rebecca Watkins, who goes by the flickr name artybecca.


Rebecca's style is truly unique--you know her work the moment that you see it--and she is also one of the most consisitently generous artists on the web, sharing her secret techniques in detail. What shines in her gallery of style is a sweet and self-effacing humor, as demonstrated by her 'buttoned-up fish" series:


She apparently creates most of her distinctive pieces from scrap clay, letting the colors of the clay dictate the nature of the piece--a refreshingly unplanned approach very much in keeping with the meditative quality of her work. Much of her work is scribed and carved with an eye to following the patterns already extant in the clay. Sculptors like Michaelangelo famously claimed that they were merely freeing the form from the stone they carved, without conscious intention, and Rebecca does the same in the medium of polymer clay.


All of her work has a timeless, organic feel that invites the viewer to sit and rest awhile--doodle a bit and see what happens---and perhaps be surpised with the outcome. So often we struggle to 'create' something--get an idea or an image out--that it's good to remember that it's just as valid to relax and let the work create itself.


Have a creative and fun holiday..


Namaste,


Randee

Friday, November 11, 2011

Make your own neckwire


Don't you just hate it when you're just about to finish a piece, and you find you lack the findings?!!
I do--when I'm ready to go, I'm ready to go. The other day I had finished a lovely pendant, reached into the drawer--and no neckwire to put it on. That meant ordering online and waiting, or heading down to the local craft outlet and hope it was on sale.


But Wait! there's a third option........I'm going to just load these pics on and you can follow along; sorry I can't think of a more elegant way to do this, but you'll get the idea...


Hope you find this useful....


Namaste,


Randee