Not all clays are suitable for all purposes. Sculpey III, soft, easy to work, and readily available in a huge variety of colors, has its uses—but not for jewelry; it simply isn't strong enough. (The one exception to this is the translucent clay, which is one of the most transparent of the block clays and is a staple in every experienced clayer's repertoire—both in its own right and as an additive—more on that later). Most 'house brands" of clay—Michael's A&C has an entire line—are so similar to SculpeyIII that you should leave them to the kiddos.
For most jewelry applications, especially for beginners, the clay of choice is either Premo or Fimo Soft. Other clays on the market include Fimo Classic, Kato, Pardo, and Cernit—which are all wonderful products, but are somewhat problematic for beginners as they are more difficult to work—try those later. When you are starting out in polymer clay, you want to enjoy the process—not spend hours trying to coax a stiff block of clay into a useful form. (I have seen newbie students reduced to tears trying to condition a block of Fimo classic they bought by mistake. When you are learning to drive, it's just not helpful to start off at the Indie 500). For me, the clay I use the most is Premo, because of its strength, work properties and most importantly, it comes in a true artist's palette—the deeply saturated colors are perfect for blending into other colors—just like paint—and literally any shade or hue can be created from them. Its mica colors are also some of the most dramatic on the market. Can you mix different brands of clay? The jury is out on that one. Some artists recoil at the thought, some embrace the notion—but I confess that I do, have been doing it for years, and nothing bad has happened as a result. One theory holds that so long as the clay is THOROUGHLY mixed, and you cure to the specs of the highest temperature clay in the mix, you can add clays to each other without incurring charges of heresy. To store your clay, ordinary plastic food bags or any plastic container marked recycle 1 through 5 is perfect.
As a general rule, properly cured polymer clay is remarkably strong—remember that it's just another form of the PVC pipes in your home (ever tried to break one of those?) and most of the time it will endure for years—still, you should keep the principles of good jewelry design in mind when forming your shapes. While polymer clay is infinitely suitable to organic branching forms, keep in mind that anything that can catch and snag can also break, no matter how strong it is. It you intend to wear it, shape it accordingly; form follows function.
Conditioning your clay:
All polymer clay requires this—kneading and working until it is soft and pliable. Think of your block of clay like a box of cereal—certain components of it, the plasticizers that make it so strong, for example—migrate and settle during shipping and storage. They need to be redistributed in order to make your clay strong and flexible, and there are several ways to do it:
First, just use your hands and a roller (do this on a NON-porous surface—ceramic tiles are great)
Slice your clay into slabs and roll with a tool (a brayer, rolling pin or metal pipe) until it softens a bit, then begin working it with your hands into logs or snakes that you twist and combine until you can bend the whole lot in half without breaking.
Alternatively—and this is the preferred method, use your pasta machine:
Note—always clean your machine with baby wipes before you begin and after every color change, and roll your clay into slabs thin enough to go through your pasta machine on the thickest setting—where the rollers are the farthest apart—without straining. There's no benefit to blowing out the gears on your machine!
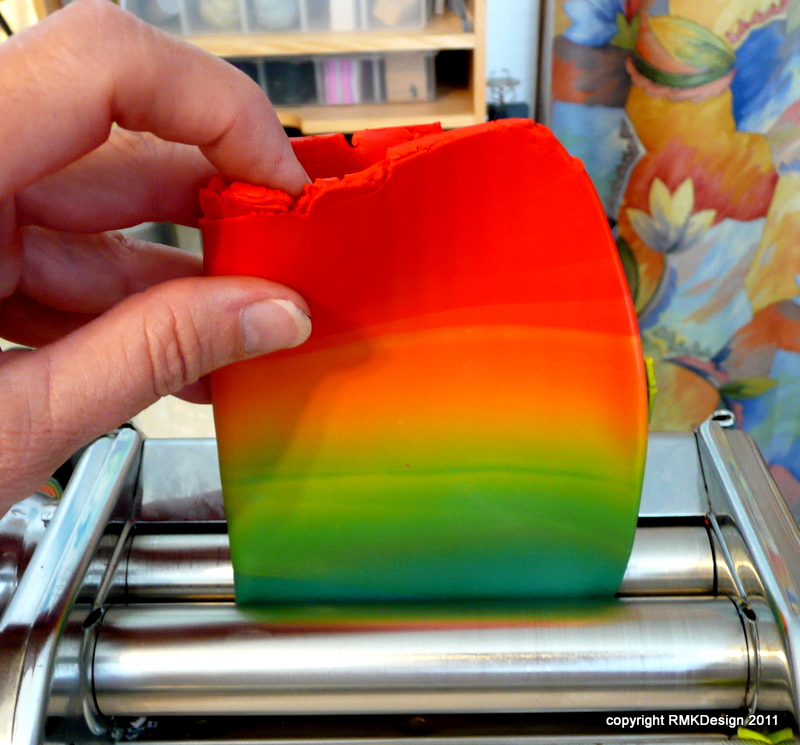
Send your slabs of clay through on the thickest setting to soften and even them out, then begin combining them two by two until you have combined the entire lot into one slab; fold this slab bottom to top and send it through the rollers fold first.
Now—and this is one of my favorite discoveries—as the sheet comes out of the rollers, fold it again, and send it through with the fold to the side.
Why the turn? Because when you turn it, it changes the direction of distribution—in plain English, it conditions the clay twice as fast as sending it through in the same direction all the time. Doesn't matter which side the fold goes through (I'm a lefty, so this is my preference). The only way you should avoid sending your clay through the machine is for the fold to be at the top—and the embarrassing sounds that it makes as those air bubbles burst if you do, will remind youJ.
When conditioning your clay, remember to work with the lightest colors first, and finish with the darkest ones—for the purposes of this lesson, the order is White, Yellow, Blue, Red, and Black—yes, I know that blue is darker than red, but red—well, just look at your hands after you've kneaded it a bit—it stains like crazy! All reds do. It disappears on the black, whereas on the blue…….
And clean your rollers after significant color changes! Really press hard against the scraper plates at the bottom—that's where all the scrap accumulates.
Sometimes your clay flakes and sticks to the rollers—what to do? Ignore it. Yes, ignore it. Don't spend 10 minutes cleaning it off only to have it happen again on the next pass—just fold the flaky side to the inside and keep rolling—SLOWLY and GENTLY. By the time the clay has conditioned into a nice pliable sheet, all the clay stuck to the rollers will have vanished; really really.
And while we're on the subject, a little safety tip from me to you: Never roll your clay backwards!!! Always move those rollers forward like an organ grinder. Why? Because if you roll the clay backwards into your machine, it will disappear right under the guard plate, never to be seen again—and eventually, it will gum up your machine until you can't move it, at which point your only alternative it to take your machine apart and clean it—and believe me, you'd rather take algebra again than do that. J
 on my own; I, of course, was influenced by looking at other artists--Kim Cavender, especially.
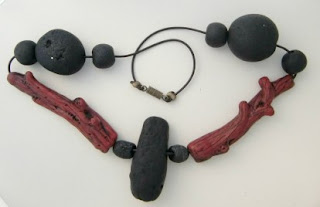
 Her screen name is Primatoide Futile, and her work is notable for the sophistication that she achieves with simple palletes and shapes--but what knocked me out was her elegant solution for the non-drillers among us--she simply combined two techniques--creating hollow tubes in polymer, then creating the twig around it;